Tuesday, November 30, 2021

New Code to use and an update

 Hi all

I wanted to pop in and say that I've been super busy behind the scenes.  I taught a big class of 11 attendees this weekend just gone.  It was great fun and I think everyone enjoyed themselves.  I've only got 2 weeks left of the school year which means I will then have several weeks break to create and plan for new and exciting things for my crafty friends early next year.  

I have also had several orders come in this week and wanted to remind everyone to use the HOST CODE at the checkout, to get a free gift in the mail from me.  Of course if you are spending over $250 yourself, to let me know before you place the order because you will get a special spending spree to yourself.  If you are purchasing from me, please share photos of your creations with me, I love to see what everyone creates. 

And some exciting news coming towards the end of this week - I am doing several online classes in the coming months so that everyone can join in the fun, from the comfort of their own lounge or craftroom.  A VIP Facebook group will be set up for each class, with a LIVE video demonstration and kits sent out beforehand so you can craft along with me.  Can't make it to the LIVE?  Thats ok, the video is recorded and stays in the group for several weeks so you have time to catch up.  The best part - each LIVE will consist of 2 card designs, however you can choose to create as many of the kits as you like.  Want to have half a dozen birthday cards up your sleeve?  Then purchase 3 kits.  All you need to do is use your stamps and adhesives and the rest is provided.  

Are you on my email list?  If not, please send me a message and I can add you to my data base (don't forget to tell me your birthday so I can send you a card)!

Happy Stamping,
Rachael xxx


Thursday, November 25, 2021

Crafty Colour Challenge


This month we were challenged to use the combination of Real Red, Coastal Cabana and Bermuda Bay.  What a lovely choice for Christmas cards!  

I've chosen a simple layout with plenty of these colours to layer, including this great dot DSP from the Heartwarming Hugs collection.  

I loved colouring this one in using just the 3 colours, the watercolour skirt is probably my favourite part of the image.  

Thanks for popping by and checking out my take on the challenge.  Don't forget to hop along to the other blogs, this is a colour combo not to be missed!
Happy Stamping, Rach xx

Monday, November 15, 2021

Lets Get Hopping #48 -CASE it for Christmas

Welcome to our Let's Get Hopping blog hop, where each month a group of demonstrators from around the world, work on a theme. 

I'm Rachael Merrick, from Queensland in Australia; welcome to my blog!

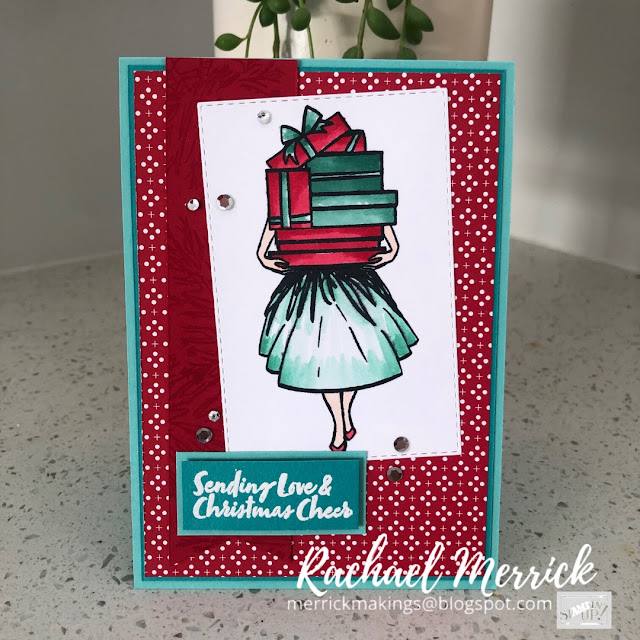
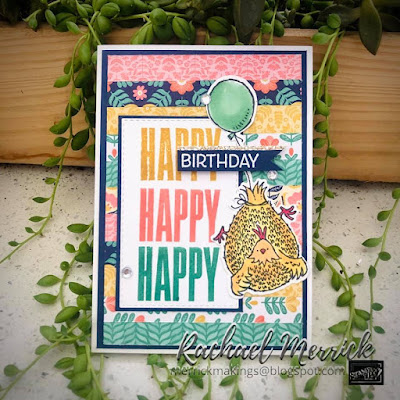
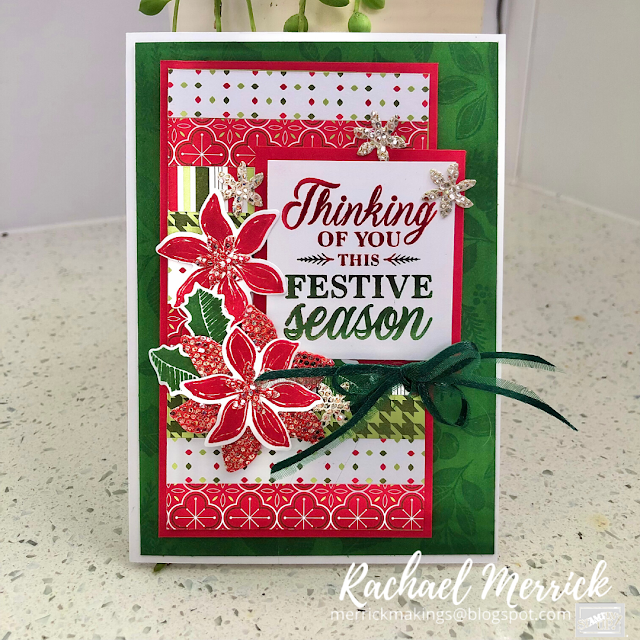
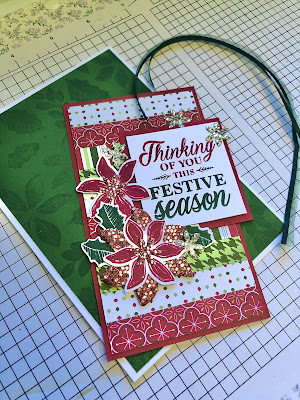
This month the idea was to CASE a previous card or project but make it Christmas.  This was a fun one to do, looking back through my cards and making a choice of which one to use because I have plenty of favourites.  I chose this birthday card, using some of my favourite DSP and the ever fun Birthday Chick stamp. 

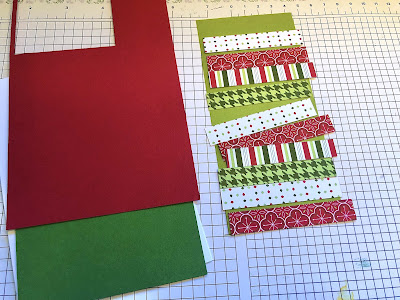
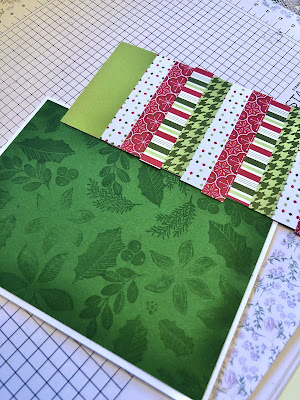
I took inspiration of the strip pieced DSP and instead of using it for the background, I created a matted central piece for the card.  
I started by cutting half inch strips and layering them over a pre cut piece of cardstock.  
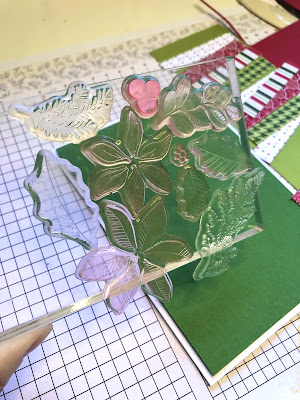
Next I wanted to add interest to the background so clustered all the images I could from the Merriest Moments set onto a larger block then using VersMark ink, stamped the entire Garden Green background.  
I then sponged garden green to the edges to give it more dimension.  Don't you love how effective this is!  
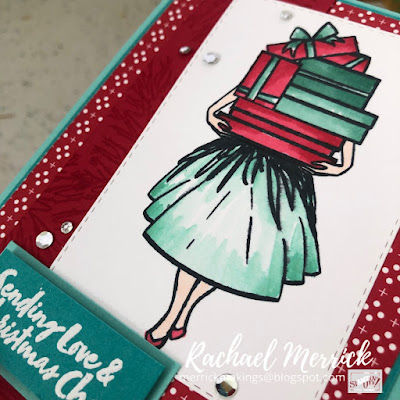
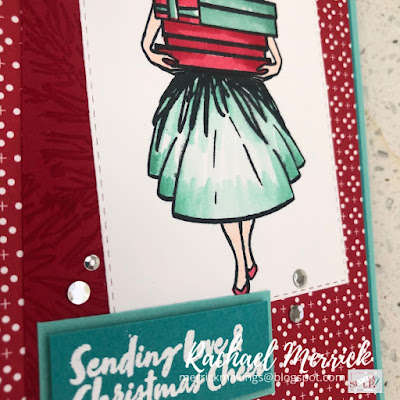
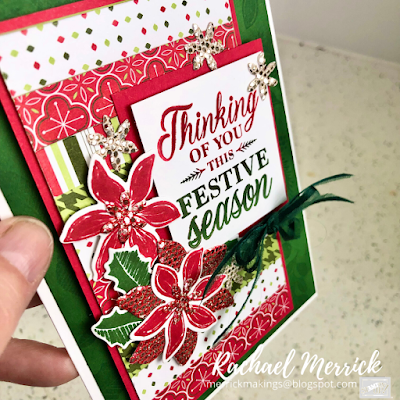
I trimmed back the strips block and matted it with Real Red cardstock before adding a sentiment and some embellishments stamped from the same stamp set.  I also cut some Evening Evergreen ribbon in half to be able to add a dark green bow element to finish off the card.
The SaleABration Be Dazzling papers, although no longer available, really had to make an appearance on this card as a nod to the original too but could easily be replaced with the red or silver foiled cardstock currently in the mini catalogue. I used my real red blender pen to colour the paper to match in better too - a great tip!
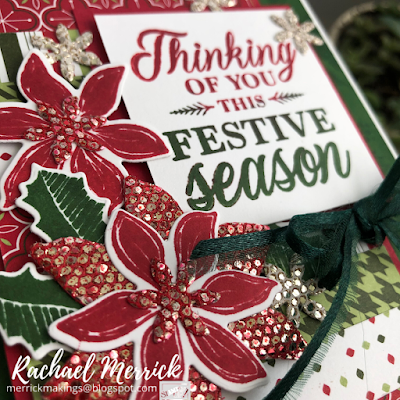
Like most of my Christmas cards, this one has a real WOW impact in real life, lots of embellishments and things to look at.  I've used plenty of dimensional dots too so that there is layer upon layer.  
TIP: when using sentiments, ink up your stamp with one colour then use a scrap to 'stamp off' a few times on only some of the words then use a dauber to add a second colour to the cleaner words.  Looks lovely when stamped.  

Thanks for popping by my blog for the hop, I hope you have found something to inspire you.  
You are now off to  the next blog with Tanya..... she is bound to have something fabulous waiting for you.  
Happy Stampin,
Rach xx


Sunday, November 14, 2021

You can't miss this!

 Starting in just a few days, is a deal that you shouldn't miss!  Its the seasonal sale, with great discounts on Cardstock, ink pads and dies.  All the essentials!  Don't forget to add the hostess code (over in the side bar) to earn an extra prize from me too.  The Sale is only for a few days so be sure to have your list ready!

If you aren't sure or need more information, contact me .

Want over $100 of product for free?  Want free shipping on your order?  Then you need to join as a demonstrator this month!  There is still time to take advantage of the fabulous Start with Savings joining offer.  Not only will you get a great bundle of goodies but you will be supported, by me and my team, to take advantage of discounts, early bird offers and more.  There is no pressure to build a business with Stampin up, in fact they encourage hobby stampers!  How great is that.  

Happy Stamping,

Rach xx


Wednesday, November 10, 2021

Technique Tuesday Hop - Designer Series Paper

Welcome to our blog hop! 

Designer Series Paper (DSP) is probably one of the best buys a crafter can make.  Not only is it pretty and  and made from sturdy heavy weight paper, its double sided.  The 'B' side is often a plainer pattern which is where my inspiration began for todays hop.

I've used one of our recent FREEBIE papers from the SaleABration.  If you are like me, you have a huge stack of DSP that doesn't get touched.  I decided to embellish my DSP for this card using a few techniques.  Below is a series of photos of how I created my distressed and layered background for my card, altering the DSP.  It really pimps it up!

Cut your DSP to the size of your card base, leaving only a small gap for a border.  
Choose a stamp set that has both a larger detailed stamp as well as plenty of sentiments. I chose Words of Cheers for a Christmas card. 

Using heat and stick powder, emboss the large image, using versamark ink.  
Rub in some of the gold flakes with your finger, really working it in to get the details to shine and show up.

Use the versamark pad along the edges of the DSP to add extra blocks of the gold foiling.  
Take the collection of sentiments as well as some of the smaller images and mount them on one side of the block, inking these with versamark also.

Stamp then emboss with white over the 'gaps' on both sides of the DSP.  You don't want the entire sentiment on these edges, so stamp over the sides of the DSP.  
Ink using matching darker inks.  I've used Cherry Cobbler and Early expresso.  The ink will stain the white slightly.  Don't forget to buff over the gold foiling with a tissue to remove excess ink residue.
Add a few embellishments and large labels and your card is done.  So much texture, interest and layers all from one plain 'B SIDE' of DSP.  I love all the little details the layering of stamping has given.  I used the "A side" to cut out the cute deer and add it to the card - it matches perfectly of course.  
Thanks for joining me on the hop.  Don't forget to join everyone else and leave some feedback. 
Happy Stamping,
Rachael xx


Saturday, November 6, 2021

Packaging blog hop

Welcome to another months blog hop where we have a 'packaging' theme.  
I initially thought I would do a cute box but decided to create this one instead - a box of gift tags ready for Christmas gifts.  So its a double dip on the theme because my box is a package for tags that finish off packages.  
The box I created was a hinged lidded rectangular box.  Inside, I have a dozen tags complete with silver trim for attaching to presents.  

I've used Heartwarming Hugs and Garden Green for this project.  The DSP was a repeat from last year and I was thrilled to see it back again because its the only DSP that I've ever used an entire pack and had nothing but a few strips left!  The patterns are cute and make for great backgrounds to add a simple sentiment and embellishments to. 
I used a few cut out holly leaves for decoration and the same sentiment in Pear Pizzazz on all the tags.  It made it easy to mass produce these.  

This will make a great gift for someone in early December.  Thanks for popping along to my corner of the hop.  Don't forget to visit everyone else to be inspired.
Happy Stamping,
Rachael xx