Showing posts with label lets get hopping. Show all posts

Monday, November 15, 2021

Lets Get Hopping #48 -CASE it for Christmas

Welcome to our Let's Get Hopping blog hop, where each month a group of demonstrators from around the world, work on a theme. 

I'm Rachael Merrick, from Queensland in Australia; welcome to my blog!
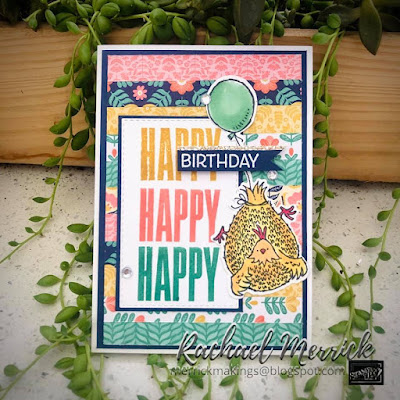
This month the idea was to CASE a previous card or project but make it Christmas.  This was a fun one to do, looking back through my cards and making a choice of which one to use because I have plenty of favourites.  I chose this birthday card, using some of my favourite DSP and the ever fun Birthday Chick stamp. 
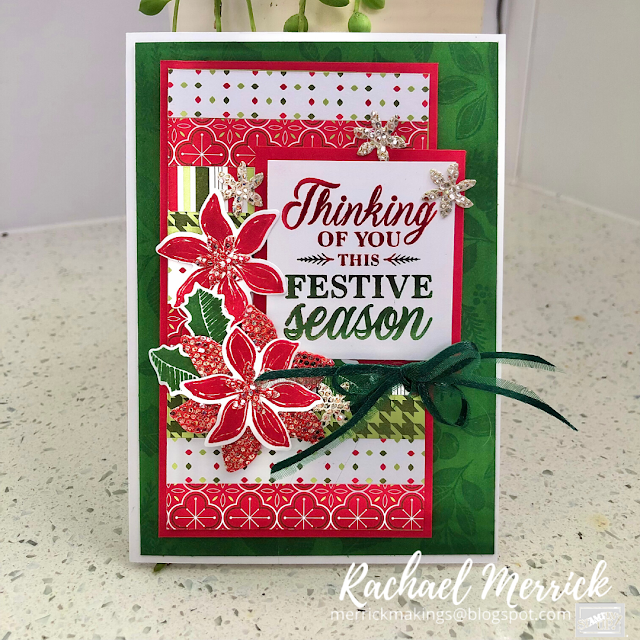
I took inspiration of the strip pieced DSP and instead of using it for the background, I created a matted central piece for the card.  
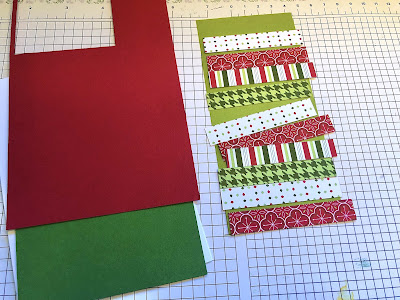
I started by cutting half inch strips and layering them over a pre cut piece of cardstock.  
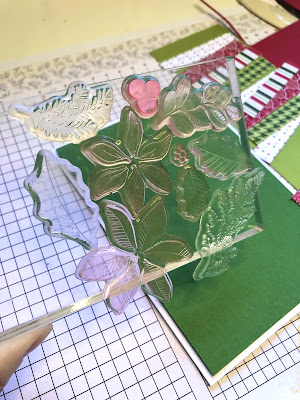
Next I wanted to add interest to the background so clustered all the images I could from the Merriest Moments set onto a larger block then using VersMark ink, stamped the entire Garden Green background.  
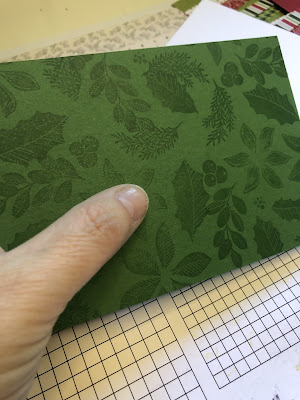
I then sponged garden green to the edges to give it more dimension.  Don't you love how effective this is!  
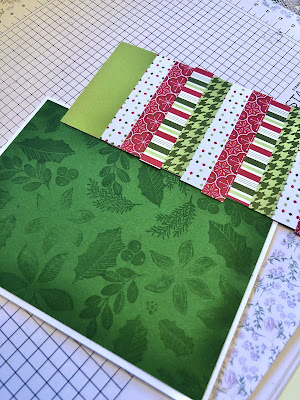
I trimmed back the strips block and matted it with Real Red cardstock before adding a sentiment and some embellishments stamped from the same stamp set.  I also cut some Evening Evergreen ribbon in half to be able to add a dark green bow element to finish off the card.
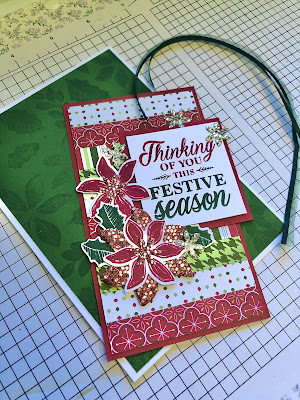
The SaleABration Be Dazzling papers, although no longer available, really had to make an appearance on this card as a nod to the original too but could easily be replaced with the red or silver foiled cardstock currently in the mini catalogue. I used my real red blender pen to colour the paper to match in better too - a great tip!
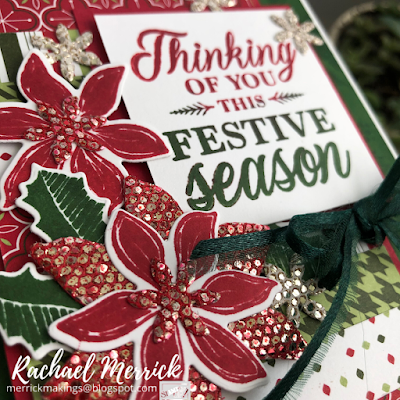
Like most of my Christmas cards, this one has a real WOW impact in real life, lots of embellishments and things to look at.  I've used plenty of dimensional dots too so that there is layer upon layer.  
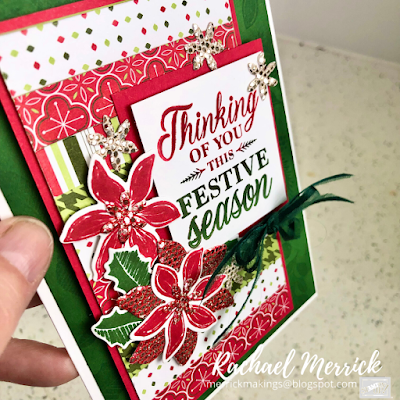
TIP: when using sentiments, ink up your stamp with one colour then use a scrap to 'stamp off' a few times on only some of the words then use a dauber to add a second colour to the cleaner words.  Looks lovely when stamped.  

Thanks for popping by my blog for the hop, I hope you have found something to inspire you.  
You are now off to  the next blog with Tanya..... she is bound to have something fabulous waiting for you.  
Happy Stampin,
Rach xx


Monday, October 18, 2021

Non Traditional Christmas Blog Hop


Welcome to another blog hop with the Let's Get Hopping crew.  
This is a fun one, with Christmas fast approaching, who doesn't love creating cards!  And this hop is all about pushing the boundaries and choosing something 'non-traditional'.  I've chosen Polished Pink and Evening Evergreen as a colour combo.  I gravitate towards red and green at christmas so this is just a little left of centre on this idea.  
I also wanted to spruce this card up with a fun fold and was inspired by a recent card swap with this one.  Its an easel card but one where the main sentiment panel pops up off the folded easel.  Fun!

Here is the aerial view to better explain what I mean. I love how it also means the card can stand up tall!  
I've added a peek a boo panel for inside the card, complete with a very pink Delivering Cheer colouring image.  

Thanks for popping along with the hop - I can't wait to read the comments and jump along to see what everyone else has created.  
In case you are keen to give this style of card a try, here is what I created behind the sentiment panel to allow for the pop up feature on the fold.  I may just have to do a quick video in the future too.

Happy Stamping, Rachael xx

Jump over to see Alicia's fabulous project


Monday, September 20, 2021

Let's Get Hopping #46

Welcome to another Let's Get Hopping Blog Hop.  

This month the theme is "anything but a card".

You have probably found your way here from Nina's blog. Thanks for popping in!

For those who don't follow me or know me well, I started creating with paper almost 18 years ago.  I dabbled with Stampin UP but my biggest passion was scrapbooking and with that comes OTP (Off the Page) projects.  So I have a secret passion for creating gifts and altering items with paper based products.

I also love to gift candles, because often, these are not something we buy for ourselves and yet there is nothing nicer than having a house filled with fragrance from a lit candle.  So for todays project, I wanted to showcase how to easily make a plain glass candle into something worth giving.  

I've recently discovered these wonderful candles at Aldi of all places!  They are cheap ($3.50) and have a lovely long lasting fragrance.  The one I have at home so far has lasted well over 15 hours!  This one is a vanilla based smell.  I've wrapped it in DSP and added elements to the top.  No need for a matching card because the small sentiment says it all.  
I've used the free papers from Sale-A-Bration for this one.  Cut the layers for the top from the 2 largest circle dies and then hand cut the floral image and coloured it using Soft Succulent, Pale Papaya and Blushing Bride Stampin Blends.  Adding a sentiment from the Penguin Place stamp set and a few bits of bling in the form of gold ribbon and rhinestones, these gifts take less than 30 minutes to complete.  I'll be wrapping this one with some clear cellophane and curling ribbon and gifting to one of my lovely friends who are popping over for a workshop this weekend.  PERFECT hostess gift for only a few dollars.  

Thanks for popping by and checking out my project.  I hope you are inspired to alter something to gift now too.  Don't forget to pop onto our next blog with Tanya, and leave comments as you go.  


Happy Stamping, 


Monday, July 19, 2021

Let's Get Hopping #44

Welcome to The Let's Get Hopping Blog Hop Round 44 where our theme is to create a project for your favourite occasion.  


Growing up, birthdays were always a big deal.  On your day, you chose where the family went, what we did and what we ate.  There was always a big cake (chosen from the Australian Women's Weekly Birthday Cake Book)!  I've tried, as a parent, to replicate that experience for my own children hoping that one day, their memories are as wonderful as mine are.  
So its only fitting to say that I love to create cards for birthdays.  Everyone deserves to feel special on their day!  I've used the 'You're a Peach' suite for this card, mainly because the colours are so happy and it makes the prettiest birthday card.  I also love the font they have used for the sentiments.  
I used Stitched Rectangle dies to cut out the basic white panel and stamped using Bashful Blue, both the sentiment and the tiny floral images that come in the stamp set.  


Thanks for popping by.  Click the link to go to the next blog post by the wonderfully talented Nina... 
Happy stamping everyone xx


Monday, June 21, 2021

Let's Get Hopping Round 43

Welcome to The Let's Get Hopping Blog Hop Round 43 where our theme is to create using a technique that is new to us.  

I have to admit, the current trend of watercolours and alcohol inks has really got me thinking about creating backgrounds.  The blend of colours and varied depths of colour make for a really unique design.  So for our hop, I decided to give block watercolour a try.
I started with my larger acrylic block and inked it up with some similar coloured inks, direct from the ink pad.  I didn't want to use drops of ink from a reinker bottle otherwise I thought I would end up with a big mess.
Next I spritzed the whole block with water, wiggling the block around a little until the colours bled and mixed a little.  Then I laid it direct onto cardstock and let it sit for a minute to start soaking up before lifting it up.  I dried it using the heat tool, again moving it around so that the drops and pools of still wet ink would move around on the paper.  I loved the result but did sit the block back on top another time to add a little more dimension.  
For the card, I created an easel card with designer series paper from the Floral Arte Suite as they used similar colours as well as stamps from the Simply Elegant stamp set.  

Thanks for popping by.  Click the link to go to the next blog post by the wonderfully talented Shelly Wadge... 


Monday, December 21, 2020

Let's Get Hopping #38 - Coordinating Envelopes

Welcome to The Let's Get Hopping Blog Hop Round 38 where our theme is to create a coordinating envelope.  

You've probably joined me from my lovely friend,  Tracy's blog.  Please pop into all the blogs to say hi and leave a comment, I'm sure the lovely participants would love to hear from you.  

I chose to use the Simply Succulents bundle for this months hop, which comes with a huge intricate background die.  I really wanted to show this off and what better way that to create a vellum envelope and line it with the die to create a shadow effect.  This bundle is in the upcoming mini catalogue and will be available from next month.  
For those who don't know me, I'm a little succulent obsessed, and have a big collection which I spent some time this week repotting ready for the warmth that is here currently in Queensland.  I did manage to get burnt in the process!  
Click on the photos to see a bigger image, this shows how the vellum really allows your card to shine even during the postage process.  A word of warning though...when using vellum to create something folded:  If you score, be very gentle.  It will tear easily.  Its a very durable paper product however doesn't take kindly to rough scoring.  
Here are a selection of my pretty plants which were great to reference when colouring to ensure I got the highlights and colours correct.  
Thanks for popping by.  Click the link to go to the next blog post by the wonderful Shelly Wadge.  


Monday, November 16, 2020

Let's Get Hopping Blog Hop for November - Gifts

 Welcome to The Let's Get Hopping Blog Hop Round 37 where our theme is 

GIFTS

I've been playing with boxes lately, especially seeing Christmas is fast approaching and I need plenty of small gifts on hand.  

There has been lots of scoring, burnishing and using Designer Series Papers to create some cute boxes ready to fill with things like nail polish and hand cream, tea light candles in pretty scents or coffee sachets with some homemade treats. These 2 boxes are just a sample of what I've made already! The tall box will be filled with shortbread cookies, mini candy canes and hot chocolate packs ready for a Christmas Eve treat for friends of ours. The box (which already has a card attached to the top) will come in handy to fill with a handmade sewing project I have in mind for a little person.

Thanks for popping by on your way through the hop.  I hope this tempts you to have a go at making some simple but pretty and personalised boxes to hold your gifts for Christmas this year.  I would love for you to leave me a comment and let me know how you are doing with your Christmas list of things to do...
Next on the hop is my lovely friend Tracy.  Pop on over there by clicking on the button below:


Happy Hopping, Rachael xx


Monday, October 19, 2020

One for the boys - Let's Get Hopping Round 36

Welcome to the Let's Get Hopping blog hop, its round 36 and my first time joining. You have probably come to me from Tracy's blog - if not, please pop back over there to say hi also.  

This months theme was 'One for the boys'.  I knew I wanted to use the "High Tide" Stamp set for this one and create a sunburst theme.  Pumpkin Pie and So Saffron make a fun and striking colour combination for this.  


I've popped the circular sentiment onto dimensional dots to lift it up from the page.  The 'ribbons' underneath were inked slightly so they had more depth.  


This probably isn't my typical type of card but as a mum of two teenagers, I think this would be the kind of card they couldn't mind getting.  

Thanks for visiting my little part of the blog hop, please leave a comment, I would love to hear from you. I know 'boys' cards aren't always easy to create, I hope this has inspired you to go bold with your colour and design choice.  Click on the arrow to go to Nina's blog next. 


Happy Stamping, Rachael xx